Find my kits here

Tasha's Playground Fan Page
Find me on Facebook
My Personal CT


Monday, March 26, 2012
Supplies-
Kit- FTU kit Thriller by A Taggers Scrap which you can download from her blog here
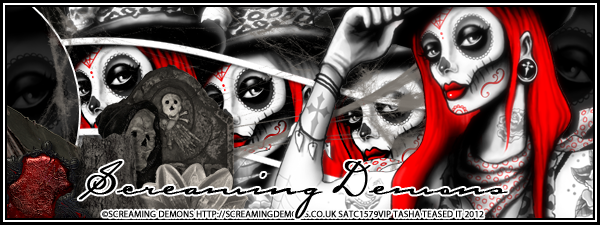
Tube- Red Death by Screaming Demons, which can be purchased from SATC with a valid license here
Template- ForumTemplate127 by Leah here
Font of choice
Photoshop CS5 or program of choice
I use a Mac, so when I use Command you may need to use Ctrl
Here we go :)
Open your template, Image>Duplicate, close out original template
I deleted the following layers: credits, stars, star shadow, wave 2, wave 3, gradients (both)
feel free to keep them if they suit your tube :)
Open Paper 11 from your kit and place it as your background.
Alternatively, you could keep the gradient layers and colorize those to match.
Now take your tube and place it above the Wave 1 layer, below the Thin Wave layer.
Command+J to duplicate it a few times.
I spread the tube copies out so her face ran along the inside of the wave.
Once happy with tube placements, merge those into a single layer. Name this "Tubes".
Now Command+Click the icon in the layer palette window of the Wave 1 layer.
This will make a selection around that layer.
With your tubes layer active, hit Command+J. Now the part of the tubes that was in the
wave layer are promoted as their own layer! Name this new layer "Middle".
Now let's add some effects to your tube layers.
Active Tubes layer. Shift+Command+U to desaturate this layer.
Duplicate. On you Tubes copy layer, Filter>Blur>Gaussian Blur at 2
Change Blend Mode to Screen.
Activate your Middle layer. Duplicate and change blend mode to Soft Light.
Add a drop shadow to Wave 1 layer.
Activate your Circle 1 layer, colorize to match tube.
Command+Click icon in layer palette to create a selection.
Add close up tube, Select>Inverse, hit delete on tube layer.
Deselect. Lower opacity to around 17%.
Add a 2pixel white stroke to the Circle 1 layer.
Repeat steps with Circle 2 layer.
Colorize border 1 and border 2 to match tube.
Now add some elements from the kit to your tag. Refer to my tag for placement if needed.
I used:
cobweb (right below Circle 1 layer)
bleeding heart
tree stump
old book
flower 3
tomb stone
Now create a rectangular selection around the entire banner using your Marquee tool
Image>Crop. This is get rid of anything hanging over the edges.
Add your copyright and license info.
Add name and any text
Merge layers, save as PNG, enjoy!
Thank you for trying my tut. If you have any questions or would like to show me your results, feel free to email me- bananas_68@yahoo.com
Subscribe to:
Post Comments
(Atom)
My Blinkies


I Get Creative For

0 comments:
Post a Comment